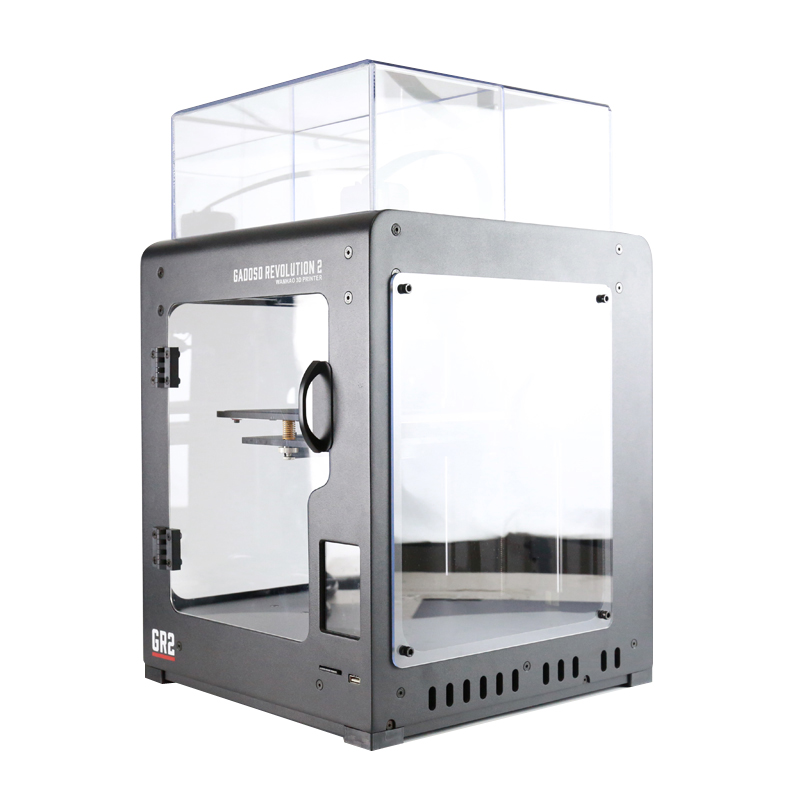
Wanhao Gadoso Revolution 2 
Hello everybody! In this post, I will discuss about this 3D Printer by Wanhao: The GR2, an upgrade from D6/D6 plus.
I will publish on this same page news about firmwares, mods and so on…
My Honest (and Fast) Review 
If you know the Duplicator 6 / 6 Plus you already know this printer: they share the same Kinematics and same structure. You can see it as a clone of Zortrax M200.
Downgrades 
-
Z-axis: D6 and Plus version had a ball screw for the build plate but GR2 has a simple T8 nut that could means less stability, but the axis is pushed inside directly in the stepper motor with an integrated ball bearings.
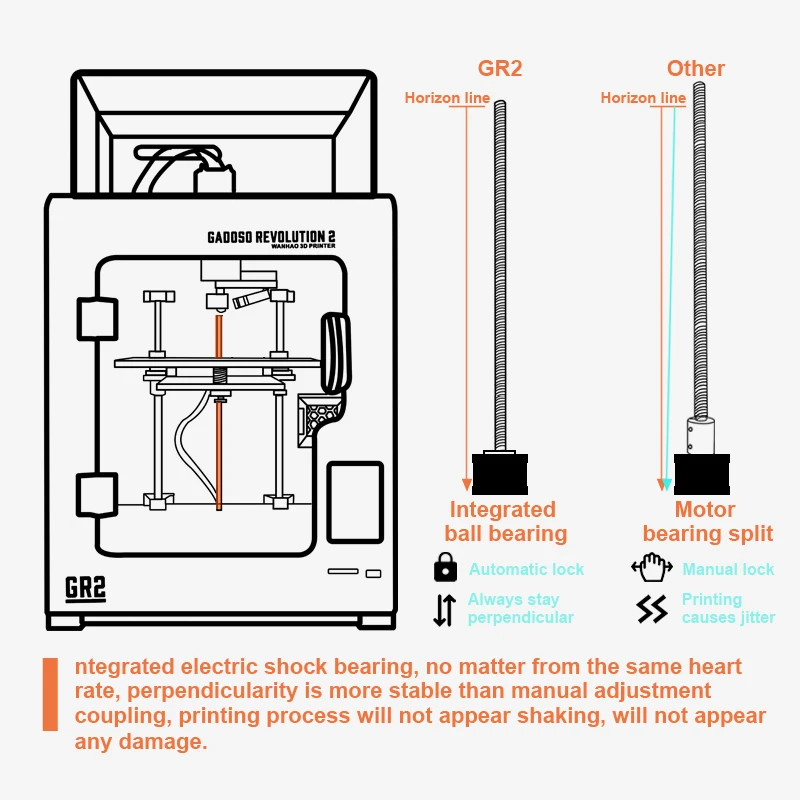
In my opinion, unless you have a bent Z-axis(which means a lot of vibration during print operation), it works very well and with a good resolution.
-
Inductive Probe Sensor: D6 Plus has an inductive probe sensor that is missing on GR2. Actually is not a big problem because the calibration will remains after a lot of prints. Just be patient and do manual bed leveling. There is an option for Z-offset to change when you swap different print bed.
Upgrades 
-
32Bit Motherboard (STM32F103VE-T6): the only bad thing here is that is proprietary MB.
-
TMC2209 Drivers: compared to D6 and D6 plus this printer will be so much quieter. Sadly they are soldered.
-
Touch Screen System: I put as an Upgrade, but probably it’s the weak point of this printer. The screen is not classic tft screen managed by Marlin Firmware: behind the screen you can find an embedded board based on an old Allwinner A33 SoC. The screen has a small number of options, and during the print operation you can’t touch almost any parameter except for temperature and print speed. The OS received two useless updates since I own the printer and I think that Wanhao stopped development. You “can” control the printer remotely… when cloud application works. If you use the Android application forget using it because never worked. If you own an iOS device probably it works when you are lucky. My advice is to replace with an Octoprint system with a Raspberry Pi. I will publish the mod in a future.

Extruder 
I want to mention this, just because at the beginning, Wanhao sponsored the printer with a new double gear extruder feeder. But after some revisions they went back to the older system (see at Wanhao D6). So if you are planning to buy a new GR2, they ship with the older one.
Video Demo 
Sadly, Wanhao confirmed to me that the printer has been discontinued. Keep this page for Firmware updates, if there will be.
Firmware 
Here we are!! I passed a lot of time chatting with Managers. After 6-7 Months, finally they gave me something to work with. After some testing now we are able to finally flash the new Marlin 2.0.8.2 update on the GR2. Everything seems to work (except for Print Bed Calibration option that you must correct through any program that can work with GCode with M851 Z command) and you can also set, for example, the stepper driver current, set microsteps and so on, directly from your favourite app that sends GCode commands (see the Marlin Documentation for more info).
Below you find the steps to flash the firmware. Use this at your own risk. I am not responsible if you brick your GR2 Motherboard!
-
Install CH340 drivers for Serial Communication (if you already have you can skip this step):
-
Download the Wanhao STM Update Tool . This application now works only on Windows and haven’t found a way (yet) to flash the firmware with other applications. Anyway you can try to emulate if you are on Linux or Mac and see if it works. The usage is very simple:
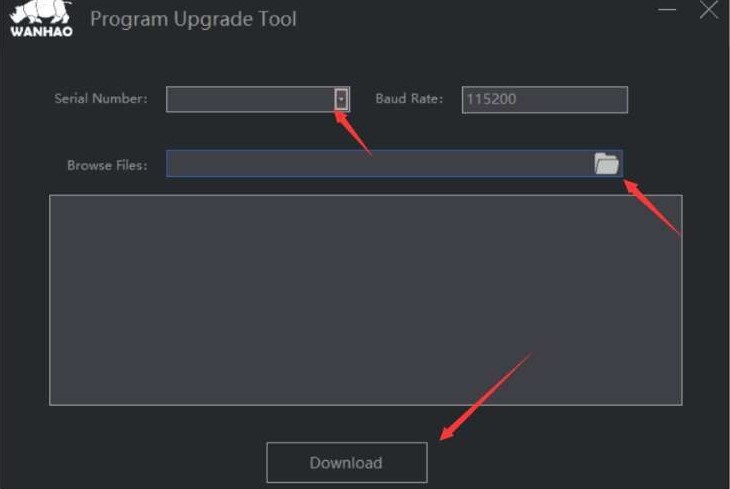
- Select the COM port in ‘Serial number’ (GR2 connected through the USB to PC)
- Select the .bin file (firmware below).
- Push Download: when the bar will reach 100% you’re done!
Now you can reboot the printer and you have your new Marlin 2.0!
Once you can play the machine through GCode commands, please put in this way:
 M502
 M500
I will leave here all the bin file, also the oldest. The 2.0 is personally compiled by me and not by Wanhao.
List(from oldest to newer):
- Marlin 1.1.8 11/19/2019 - First release
- Marlin 1.1.8 01/05/2021 - Second Release (Unknown Changelog)
- Marlin 2.0.8.2 06/01/2021 - Newest release - Changelog:
- Based on latest stable Marlin release.
- Now you can set stepper current, microsteps, TMC enabled…
- Linear Advance active: value is set on 0. Try your own if you like but before you need to change TMC Drivers to Spreadcycle with M569 S0 X Y Z (E is already in Spreadcycle).
Nozzle Park Feature active: I had to disable this because the original screen doesn’t care at all.- PrintBedCalibration working now from the original screen!
- E TMC Driver is now on spreadcycle mode
- It has been tested that now there aren’t any lockdown when mounting new stepper motors with 0.9 degrees or a BMG Extruder. You can do it and you don’t need to change firmware settings but only some parameters with the GCode through Pronterface or whatever. For the BMG , it depends on which motor you mount but you only need to swap some cables. So that’s it. For using 0.9 Stepper motors on X and Y you have to set 320 steps for X and Y. For BMG you need 830 esteps in E for 1.8 motor or 1660 for 0.9 motor.The printer has a setting of 32 Microsteps, so don’t worry for these higher values than normal.
- Fully compatible with Octoprint.
- To compile your own firmware just check my repo(I suggest VS Code): https://github.com/GiDiPa/Marlin-2.0.8.2-WanhaoGR2
*After the Update you should probably redo your Z-Offset because the default offset is 0.
** For Any operation to set new E-steps, Driver Current and so on… My advise is to use Pronterface ! For any of these operations, please check the Marlin Documentation!
I want to thank my “GR2 Team”: @CosminMake, @Droylam, @luckylup. Many thanks for your support and contribute to this project!
Mods 
These mods I’m going to put here are personally chosen because I think they are the best Mods you can find for GR2 Printer. I won’t show how to mount, and other things because it is really easy to understand: in any case you can ask on FB or Telegram Group!
Use these at your own risk. I am not responsible if you damage some parts of your GR2 Printer!
Fun Ducts: 
- Z-Storm: https://www.thingiverse.com/thing:4906151
- Z-Vent: Just the heatsink slot or also the funduct if you want to install just a 4010 fan https://www.thingiverse.com/thing:2797152 (on telegram group you can find also a D-Storm that is almost the same thing, probably better adapted for Wanhao D6/GR2)
- 5015 Fan Duct System with Probe 8 Mount : https://www.thingiverse.com/thing:4769322 - if you don’t want the probe mount but only the fun duct system
*Fan5015 or Radial Fan4010 to buy!
Replacing Display system (the crap of this printer): 
Raspberry Mount and osoyoo DSI screen : https://www.thingiverse.com/thing:4888731 . You will find all the stuff to buy inside the link. We recommend them because we are working with that Items.
BMG Extruder: 
- Original Bondtech
- Redrex Clone (which is quite good to me)
- Trianglelab BMG V2 - So gooood but you need to wait a bit.
BMG Support: 
- BMG support by liftbag (my first choice for Flat cable protection) - Liftbag Model Page
- BMG with inclined flat cable support - https://www.thingiverse.com/thing:4642479
- BMG optimized for Trianglelab BMG 2.0 - https://www.thingiverse.com/thing:3388721
- BMG for original motor - https://www.thingiverse.com/thing:3779339 (the original motor doesn’t fit in Y size, so if you prefer you swap with a pancake motor - see Motor mod - or you can stay with this).
OMG Extruder and support: 
If you don’t want to lose any mm in Y(with BMG happens if you stay with the original motor) this could be a good solution for you!
- OMG Extruder - Here!
- OMG Support - https://www.thingiverse.com/thing:4939443
Motor Mod: 
There’s not too much to write here: the best thing you can do is swap the 1.8 Moons motor(believe me, except for Extruder motor that is too low in Ampere, the other are good). But if you want improve precision, more stability and engine torque then you need 0.9 motor. Actually I don’t know what to advise for Z but, for X, Y and E you can use https://e3d-online.com/products/motors (2 Compact but powerful and 1 Slimline motor).
Filament Sensor: 
*At this state there is no hope to make a filament sensor work with GR2 Stm32f103 Mainboard. So in any case you have to use a raspberry pi installed to use this, with plugins you can find on Octoprint Plugin Manager. For connection see the Raspberry Pi Tutorial below.
- Re-Use your Z-max endstop - https://www.thingiverse.com/thing:2274534
- Smart Filament Sensor BTT - download by CosminMake
BTT Smart Filament sensor - here!
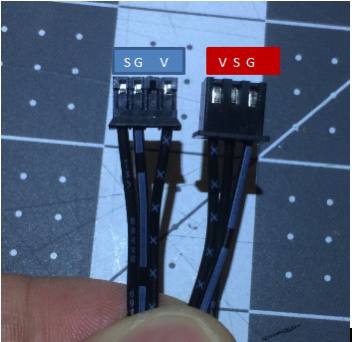
Inductive Probe Sensor for Autoleveling: 
Sadly, is not possible to mount a BL-Touch. We tried but is an hard work and probably is better to buy a new SKR or MKS board to do this. It’s up to you. To connect this on motherboard follow the Raspberry Pi Tutorial below.
*It is not possible to use the inductive probe sensor with Z-Storm and Z-Vent because the optimal place we found is only on the front and with that stuff is almost impossible. Try your own solution if you don’t like. We strongly suggest to use the 12mm inductive probe because 8mm could be very unstable if you swap the build plate.
- Inductive Probe Sensor 12mm : Buy here or find in your amazon country(you also need to crimp the pin so I suggest this Kit).
- Mount for Masp V1: https://www.thingiverse.com/thing:4937390
- Simple mount : https://www.thingiverse.com/thing:4890415
Hotend: 
You don’t have to many options: or you stick with MK10 or you can use some V6 (or also Volcano) hotend adapted for GR2.
For MK10:
- Cheap solution: Trianglelab Micro Swiss MK10 hotend
- Original: MicroSwiss Mk10 All metal hotend
- Original with Better Heatsink
V6 solutions:
- MASP Solutions : V1 or V2. Contact him to ask which is the better solution for you if you interested.
- Copper Heatbreak Mk10 to v6 + Lerdge Block (choose the one you prefer but you need to change also Thermistore and Heater) + A V6 Nozzle.
In both cases I suggest to buy a Nozzle X from V6.
Pi Cam: 
If you are going to do the Raspberry Pi Mod, it is recommended to buy a Pi Cam because the original webcam won’t work with a usb cable (a lot of green noise).
Pi Cam Support - coming soon
Pi Cam to buy - Here
Bonus! Magnetic Build plate: 
It’s a cost, but it’s very confortable and easy to use for removing printed object from the bed. Pei double side (smooth and textured) 220x220 with a magnet plate to apply!
Or (if you have patience):
Bonus pt.2: 
If you have enough space for your upper plexiglass and you want cables to have better movements (also for filaments) print this:
https://www.thingiverse.com/thing:4937430
Bonus pt.3: 
PTFE Tube. Buy a better PTFE Tube for your filament!
Raspberry Pi + Octoprint + Octodash Tutorial: 
If you setup the printer as I show in the video down below, please consider to flash this firmware - Marlin 2.0.8.2 Mod Probe
Octoprint Image to flash with balenaEtcher + configuration files : https://mega.nz/folder/QYp0yaTS#eTYCNf1P4HkXOM5y0TM4sA
Password for access Octoprint page:
- User : wanhaogr2
- Pass : wanhaogr2
Access in ssh(you must configure Octopi-WPA-Supplicant file to access internet):
ssh [email protected]

#password is "raspberry"
Raspberry Pi GPIO Scheme Connection(PI 2, PI 3, PI 4):
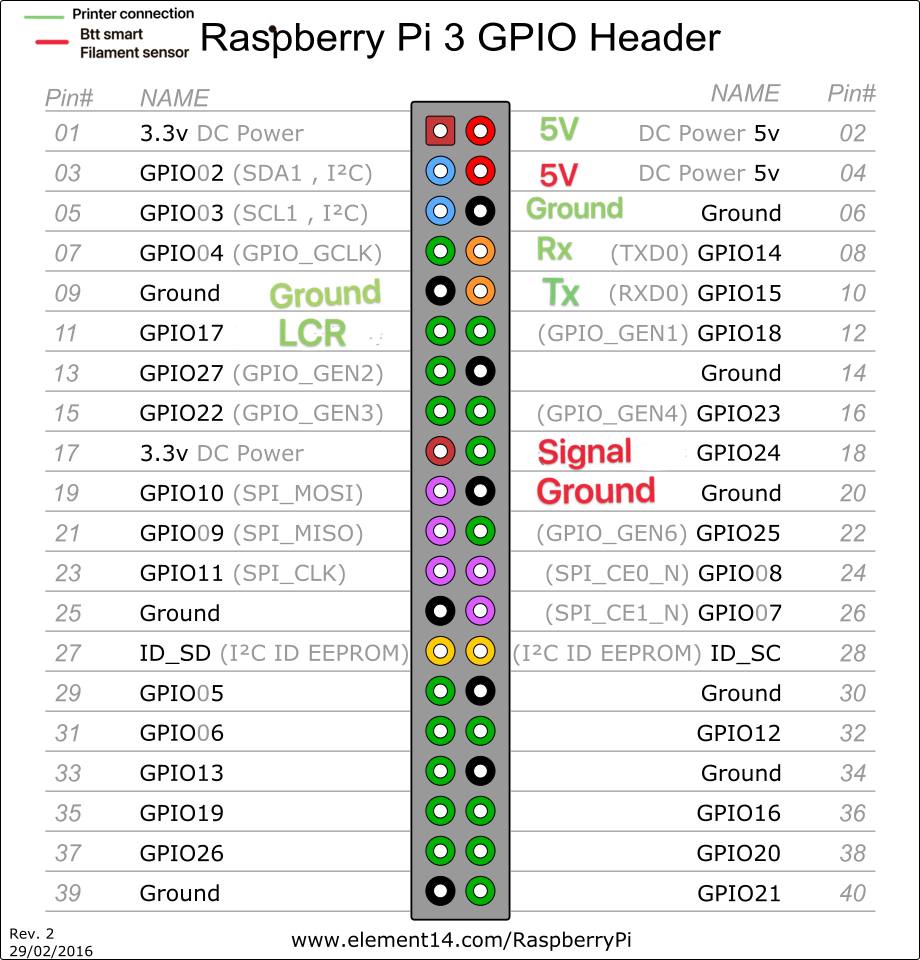
Pin Scheme of BTT Filament Sensor:
N.B.: If you want to use an Endstop as filament sensor, probably you should connect only GPIO 24 and Ground without 5V pin. I am not sure about this, but there is another plugin for this kind of filament sensor. If you’re interested in this other kind, do your own research :) !
Groups: 
Telegram (Italian Group): https://t.me/wanhaogr2ita
Facebook (English Group): https://www.facebook.com/groups/673187166794113
Donate 
If you like my job, please feel free to donate me a coffee :) !
paypal email: [email protected]
(Don’t have a Paypal button yet XD )
Updates: 
08-24-2021: on this date, I consider my work done on this printer. I’m sure that I won’t publish anything for a long time. I will consider update Marlin firmware only if something cool new functions are going to be implemented. See ya!